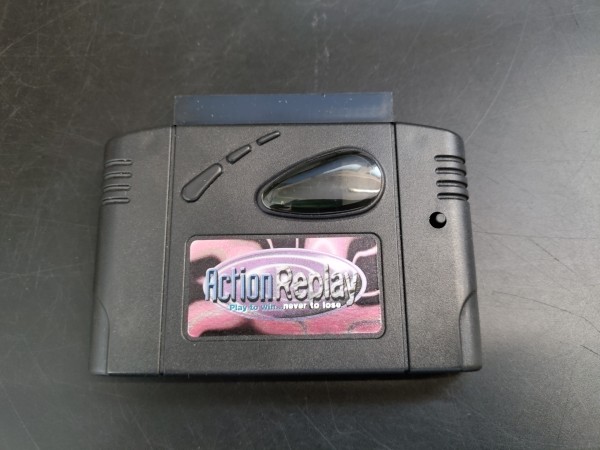
Produktinformationen "Nintendo 64 Action Replay / Game Buster"
Eine Cheat-Cartridge ist ein Gerät, das mit jeder Art von Cartridge-basiertem Videospielsystem verbunden werden kann. Es ermöglicht einem Benutzer, spezielle Cheat-Codes einzugeben, um ein Spiel auf eine Weise zu manipulieren, die von seiner ursprünglichen Programmierung nicht erlaubt ist. Normalerweise besteht der Effekt darin, unendlich viele Leben und Munition zu gewinnen, Geheimnisse aufzudecken oder Dinge zu tun, die andernfalls einen unfairen Vorteil (oder in einigen Fällen einen Nachteil) ermöglichen würden. Einige Spiele haben Codes, um unveröffentlichte Level, Waffen oder Gegenstände zu aktivieren, die normalerweise nicht verfügbar waren, und einige haben sogar Codes, um auf Debug-Menüs zuzugreifen, die von Programmierern verwendet werden (wie für Beta-Testzwecke). Für moderne Spielsysteme, die optische Medien anstelle von Kassetten zum Speichern von Spielen verwenden, wurden gleichwertige Nicht-Cartridge-Geräte veröffentlicht und verkauft.
Englische Anleitung:
Introduction Congratulations! You have purchased the ultimate game enhancer for the Nintendo 64 game system. With Game Shark, you can take your gaming to new levels of fun and excitement. Game Shark allows you to enable features and enhancements to your Nintendo 64 games that you never dreamed possible. Find new levels in your favorite games. Gain infinite lives. Modify the game to your specifications. Game Shark is completely menu-driven. You don't need to add codes letter by letter, number by number, every time you turn your machine on. All you need to do is highlight the enhancement(s) you want to use and start playing games like never before!
And in a ground-breaking method of enhancement, you can save codes to the Game Shark's built-in memory! Enter a code once, and that's the last time you'll have to punch it in! This is the future of game enhancement, and it's in your hands!
Instructions for Start-Up
Switch off your Nintendo 64 and plug the Game Shark into the cartridge port. Make sure the unit is pushed firmly into place and that the Game Shark label is facing the front of your Nintendo 64 console. Next, push the game cartridge that you wish to play firmly onto the socket on the top of the Game Shark. Make sure that the label of the game cartridge is also facing to the front of your Nintendo 64 console.
Never, under any circumstances should you plug any cartridge or accessory into the Nintendo 64 console with the power on. Doing so could result in damage to the Nintendo 64, the Game Shark, or both.
Switch on your console and Game Shark is ready to go. The LED display on the front of the unit will count down from 5 to 0 indicating that the Game Shark is ready for use.
Instructions for Use
After the title screen, you will see the Game Shark's Main Menu screen. The Main Menu is composed of three selections as described below.
Use the up and down arrows on your controller's digital direction pad to highlight your selection. Press the "A" button to select. Use the "B" button to return from the selected screen.
Some games require a special Keycode in order to assure compatibility with Game Shark. For instructions on Keycodes see the "Using Keycode" section later in this manual.
1. Start Game
Choosing Start Game takes you to the Start Game Options menu. You will then be presented with three options:
a.) Start Game With Selected Codes
This option starts the game using any enhancements selected from the Select Cheat Codes menu.
b.) Start Game Without Codes
This option starts the game without any enhancements. The game will play as it normally would.
c.) Cancel - Return to Previous Menu
This option takes you to the opening menu.
Use the up and down arrows on your controller's digital direction pad to highlight one of these options. Press the "A" button to select.
2. Select Cheat Codes
This option takes you to the preloaded list of games and codes currently stored within the Game Shark's internal memory. Games are listed alphabetically. Use the up and down keys on your controller's digital direction pad to highlight the desired game and press the "A" button to select. The "R" and "L" buttons will "page up" and "page down" through the game list respectively. The "B" button will return you to the previous menu.
Once you've selected a game, a full list of preloaded cheats will appear on the screen for the game chosen. Use the up and down arrow keys on your controller's digital direction pad to highlight each individual cheat. Pressing the "A" button will toggle the cheats on and off. You can activate almost any combination of enhancements. NOTE: A maximum of 15 codes may be enabled at one time. Experimentation will help you determine the best combinations of codes for each game. Activated cheats will be highlighted in green. When you are finished selecting the desired cheats for the game you are about to play, press the "B" button to return to the previous menu, or the "START" button to go to the Start Game menu. Please see instructions regarding the Default Box below for more information on setting an individual cheat's default status to "ON" or "OFF".
Adding New Cheat Codes
As new games are released, you will want to load new cheats for those games into the Game Shark's memory. These codes could be ones that you have seen in magazines, acquired from our 900 number, found in the Game Shark newsletter - Dangerous Waters, or obtained from our World Wide Web page (www.gameshark.com). InterAct is making sure that you always have the newest codes for the hottest games available and that these codes are always within easy reach.
Entering New Games
To enter new codes, simply go to the Select Cheat Codes menu where existing games and cheats are listed. Highlight the "New Game" selection at the top of the game list and press the "A" button to select it. This will take you to the New Game Edit screen. This is the screen where cheats for new games can be entered. If you select the New Game option, you will be presented with a text entry box. Use your controller's digital direction pad to highlight letters from the text entry box to spell the name of the game you are about to enter cheats for. Use the "A" button to select a letter. When you have finished entering the name of the new game, press the "B" button and "save changes" by pressing the "A" button.
Note: "L" is used to "backspace" and "R" is used to insert a blank space. Using the "r " (C-up) button on your controller will toggle the text entry box between upper and lower case letters.
New Code Description
By selecting the New Code option at the top of the code list and pressing the "A" button, you will be taken to the EDIT CODE screen. Here you will be presented with a new text entry box once you select New Code Description (by pressing the "A" button while the selection is highlighted). This is where you will give your new codes description headings. You will probably want to name your new enhancements something similar to the enhancement that the code enables. For example, you may want to name a new enhancement "Infinite Lives". Enter the name as you did when entering the New Game name (as described above). Press the "B" button when you are finished. Next, press the down arrow on your controller's digital direction pad to take you to the blue Code Entry box in the lower left-hand side of the screen.
Code Entry
This is where you will enter the actual cheat code. Each code will include numbers and letters. Again, use the controller's digital direction pad to highlight the first line and press the "A" button to bring up the Code Entry box. Use the controller's digital direction pad to highlight each letter and number and the "A" button to select each desired entry.
Continue until the entire code is entered. Individual codes can sometimes be quite long, so a bit of concentration may be required. If you make a mistake while entering a code, don't panic. You can use the L and R "trigger" buttons to move forward and back if you need to re-enter a number or letter. Simply go the letter or number you entered incorrectly, and select the correct letter or number to replace it. The new letter or number will simply overwrite the old one.
Note: Some enhancements may require numerous lines of code to be enabled. After entering the first line, simply use the down arrow on your controller's digital direction pad to move down to the next blank line and continue entering the next line of code.
After you have entered the new code for this game, press the "B" button and confirm that you want to save the changes by pressing the "A" button. This will return you to the Select Cheat Codes menu. You can now select the game and cheat code you entered to test them out. Your new code has been saved to the internal memory of the Game Shark and will remain there until you decide to delete it. You can add additional codes to any game simply by highlighting the "New Code" line, pressing the "s " (C-down) button and going through the entry steps above.
Default Box
The default status of each enhancement can be toggled on and off by highlighting the Default Box that appears in the Edit Code menu and pressing the "A" button. With the Default Box set to ON, that enhancement will always be active when you select that particular game from the menu. When the Default Box is set to OFF, you will need to activate the codes each time you start that particular game. When the Default Box is set to BUTTON, the enhancement is activated when the small "GS Button" located on the front of the Game Shark unit itself is pushed.
Memory Card Manager (available on Version 2.0 and higher)
The Memory Card Manager allows you to view the contents of any memory card up to 1998 blocks in size. Follow the simple on-screen instructions to load, save and copy between memory cards. In addition, it is possible to copy the game saves from inside your game cartridge onto memory cards.
Introduction to the Memory Card Manager At the main menu of the Game Shark select Memory Card Manager and press "A", you will now be in the Memory Card Manager. The Memory Card Manager Screen
Your Game Shark will now present you with two blue boxes. Select either Game Pak - save files stored on the cartridge, or Controller - save files stored on the memory card inserted into the controller. At the bottom of the blue boxes the amount of space in use will be displayed after the "PAGES:" heading. The amount of space available will be displayed after the "FREE:" heading.
Copying and Deleting Files
Once the save file has been selected (highlighted in bold white text), press the "A" button to copy the file. The directional arrow beside the word "COPY" will point in the direction of the destination of that file, if the instruction reads "A: (- COPY" the file will be copied from the left box into the right box. To delete a file, select the unwanted file and press the Z button. At this point a confirmation screen will appear, select either "YES" or "NO" using your controller's digital direction pad. Finally, press the "A" button.
Smart Card Port The Game Shark has a unique Smart Card reader/writer slot at the rear of the unit. This slot will support a range of Smart Cards including Ram, Rom and Flash Rom cards. These cards will offer features including special game cheats and memory card support. Watch out for these exciting products as they become available for your Game Shark in the future. Full instructions for the use of this expansion port will be included with the new products.
LED Indicator
Game Shark has a built-in LED display. This feature will also be fully utilized with future products available for the Smart Card Port of your Game Shark.
GS Button
This feature is used to enable specific codes. If the GS Button is required for the code it will be noted in the code description, as in "Press GS Button For 99 Coins." This button may also be utilized with Smart Card products available soon for Game Shark.
Exiting Back to the Main Menu
To exit the Memory Card Manager and return to the Main Menu, simply press the "B" button.
Using KeyCodes
Some games will require a Keycode, or specific activation code, in order to use any enhancements. These Keycodes may be shared by some games, while other games will require their own specific Keycode. Not all games will require a Keycode, but you will know that one is required if the game will not load when the Game Shark is present. Your Game Shark currently contains Keycodes for any games that require them. As new games are released, any new Keycodes required will be provided through our website (www.gameshark.com) or our Technical Support Department. Once you receive the new Keycode from InterAct, follow the directions listed below to activate it properly.
WARNING: Do not activate any Keycodes unless you have the game available. Entering a Keycode without the game that requires that keycode will cause the Game Shark to lock up until that game is inserted.
How to Get Started with Keycodes
Games that require Keycodes are not compatible with the Game Shark until the corresponding Keycode is activated. For this reason, you will need to insert another game first to get into the Game Shark menus and activate the correct Keycode. Choose a game that you know works fine with the Game Shark to utilize as your Set-Up Cart. Once the Keycode is activated, you will need to turn off your Nintendo 64 system, remove the Set-Up Cart and insert the new game requiring the Keycode, then power up again to play.
Adding New Keycodes
With a standard game, or Set-Up Cart inserted, go into the Main Menu and press both the "L" and "R" buttons simultaneously to get into the Keycode menu. Push the analog stick of your controller all the way down until a blank Keycode is displayed, then press the "A" button to select. You can now enter a new Keycode and comment. This only has to be entered once, and will be stored in your Game Shark's internal memory for future use. Once the Keycode has been added, follow the instructions for activating it as described below.
Activating a Keycode
While in the main menu, press both the "L" and "R" buttons simultaneously to get into the Keycode menu. In this menu, any current Keycodes will be shown, along with a comment or description. Select a Keycode by pushing the analog stick on your controller up or down to highlight the code wanted, and then press "A" to select it. At this point, a warning is displayed to confirm that you have the game associated with the selected Keycode.
IF YOU DO NOT HAVE THE GAME AVAILABLE, DO NOT PRESS THE "A" BUTTON TO SELECT IT. IF YOU DO SELECT THE KEYCODE, THE NEXT TIME YOU POWER UP THE GAME SHARK, THAT SPECIFIC GAME MUST BE PRESENT. BE WARNED - IF THE GAME IS NOT PRESENT, YOUR
GAME SHARK WILL LOCK-UP UNTIL THE SPECIFIC GAME REQUIRING THAT KEYCODE IS INSERTED. If you have the game, and are prepared to activate the Keycode, follow the on-screen instructions and then turn your Nintendo 64 system off. If you do not have the game, press any button on your controller to deactivate this selection. Starting the Game with Keycode Activated Once you have activated the Keycode and turned the system off, remove the set-up cart and insert the game for which the Keycode was activated for. Next, power up and use the Game Shark with enhancements, as usual. You can add new enhancements for the game, activate them and deactivate them as needed. Please note that the Keycode system is a "one-shot" operation. This means that after you have finished playing a game requiring a Keycode and then switched off your system, it will return to the factory default settings. You will have to repeat the Keycode activation procedures described above every time you use one of these games requiring a Keycode. It is best to use a game cartridge which you know works with Game Shark's factory settings as a standard Set-Up Cart. Getting New Codes There are four ways you can get new codes for your Game Shark. One way is join Dangerous Waters, the exclusive members-only newsletter that is chock full of codes, news and feature stories. Full details on joining are on the membership card enclosed. You may also visit our Surfing with the Sharks website at www.gameshark.com. For those of you with limited internet access, we also provide a "900" number dedicated to Game Shark codes. The number for the Game Shark Hotline is 1-900-773-SHARK (7527). The call costs $1.29 per minute, and you must be 18 years old or have your parent's permission to call. Finally, check your favorite Video Game Magazines for official Game Shark codes. Each month, new Game Shark codes will be published in various gaming magazines. As you can see, there will never be a shortage of codes for Game Shark.
Note: Unofficial and unauthorized codes can cause your Game Shark to lock-up and require reprogramming. Only use InterAct's fully-tested and approved codes to assure compatibility.
Troubleshooting
If you are having problems with your Game Shark, make sure the cartridge is plugged in properly. If you are having problems with codes, make sure you have entered the code or codes properly. If you are still having problems, you can call our Technical Support department at (410) 238-1426. Please DO NOT call this number for codes, as they are not available through Tech Support. Tips and codes - Game Endings - Java Games - Reviews - Fun Stuff
System:
Nintendo 64
Zustand:
Guter gebrauchter Zustand inkl. 1 Jahr Garantie
Weiterführende Links zu "Nintendo 64 Action Replay / Game Buster"

")

")


")


")

")


